If you’re one of the billions of individuals who wear corrective lenses to see clearly, chances are you’re familiar with
phoropters
(even if you don’t realize it).

You may recognize the phoropter as the piece of equipment that checks your prescription strength—but this instrument can do much more than that. With a long history and technological advancements, phoropters are incredibly complex and continue to
evolve today.
So, What Is
a Phoropter?
Patients sit behind phoropters during eye exams.
These instruments, which look like mechanical masks, check and verify a patient’s optical prescription—but can also be used to measure:
-
The eye’s natural resting position
-
Focal ability
-
Eye movements
-
Binocular vision
Made up of cylinders, prisms, and lenses, this instrument is most commonly used to measure the eye’s
refractive error.
First, What Is a Refractive Error?
Before learning more about the equipment itself, it’s helpful to understand the vision impairment phoropters are used to correct.
Put simply, a refractive error is
blurry vision. There are several common types of refractive errors:
-
Nearsightedness (Myopia):
Far away is blurred
-
Farsightedness (Hyperopia):
Up
close is blurred
-
Astigmatism:
Stretched out or blurred vision
-
Presbyopia:
Up close is blurred as a result of aging
Believe it or not, a refractive error is actually all about
light and the shape of our eyes.
Refractive Error 101: Light and the Retina
Our retina sits in the back of the eye, near the optic nerve. When light passes through the eye, it lands on this extremely thin layer of nerve cells.
When light touches the retina, it sends a message to the brain (via the optic nerve) to see and interpret the images in front of us.
Here’s how it
should work:
If you shine a light into an eye with perfect focus (20/20 vision), the light hits the back of the retina at one single point, like a bullseye.

The reflection of that light bounces back out of the eye; and no matter what direction the beam of light entered the eye,
the reflection will always project back out the same way.
However, for those with a refractive error, the “bullseye” is off.
In other words, the light entering the eye either lands in front of or behind the retina; thus, the reflection will actually move depending on the direction of incoming light.
Nearsightedness and Farsightedness
For a patient with nearsightedness (far away objects are blurry), light rays don’t pass all the way through the eye to the retina. Instead, images focus
in front of the retina rather than
on the retina.
For a patient with farsightedness (close objects are blurry), light rays pass through the retina. So, images focus
behind the retina instead of
on the retina.
Ultimately,
the length of the eye is to blame.
Put simply, myopia is the result of an eyeball that is too long (so images focus in front of the retina).
Hyperopia is the result of an eyeball that is too short (so images focus behind the retina).
What About Astigmatism?
An astigmatism also causes blurry vision; but instead of the eye’s
length, an astigmatism is caused by the eye’s
shape.
Here’s how it works:
An eyeball should be perfectly round, like a basketball. So, when light enters through the cornea, it bends evenly.
But some eyes are shaped more like a football. So, that incoming light bends in different lengths and directions; thus, things at a distance start to look blurry and stretched out.
And Presbyopia?
Presbyopia, on the other hand, is the result of the hardening of the eye’s lens, a normal occurrence from aging.
While blurred vision from myopia, hyperopia, and astigmatism is a result of the eye’s structure, presbyopia stems from the eye’s
lens.
The lens, which helps focus light like the cornea, is flexible enough to change shape in order to focus on objects that are up close.
When that flexibility decreases, the eye can’t focus; thus, those images become blurry.
Diagnosing (and Correcting) Refractive Error: Routine Eye Exams
Maybe you started squinting at the TV or had trouble reading the pages in your book. Perhaps you’ve had headaches or eye strain.
Whether you already have corrective lenses or not, blurry vision is an indication that it’s time for a routine eye exam.
These exams follow a general
21-point checklist. After settling into the
exam chair in the eye doctor’s office, the exam begins with
ophthalmoscopy.
This test uses an
ophthalmoscope, where a small beam of light is directed through the pupil to detect abnormalities on the lens of the eye, optic disc, vitreous humor, and the retina.

Next is a quick
keratometry test, which measures the curvature of the anterior surface of the cornea.
This test uses a
keratometer, an instrument known for measuring astigmatism. But the corneal curvature information keratometers provide is generally used for contact lens fitting and well as
IOL calculations, and
corneal refractive surgery.

Next, the doctor will move on to a
subjective refraction exam.
Patient, Meet Phoropter: Subjective Refraction Exam
A refraction test helps determine a patient’s corrective lens prescription.
Here’s how it looks in action:
From behind the phoropter, the patient looks through the mask’s lenses at a chart about twenty feet away.
Manipulating the refractor’s lenses, the doctor asks the patient a series of subjective vision questions in hopes of finding a lens combination that brings his or her vision to 20/20.
To the patient, the flipping of lenses and twisting of knobs probably seems sporadic, but there is a very strategic and meticulous set of steps to run through this test.
Phoropters and the Steps of Refraction
A typical refraction exam with a phoropter involves the following steps:
Sphere
Checking the patient’s sphere is the first step of a refraction exam.
You may have noticed “sphere” (or “SPH”) written on your corrective lens prescription. In simple terms, “sphere” refers to the amount of lens power (measured in diopters) needed to correct nearsightedness (-) or farsightedness (+).
If a patient requires a
spherical correction, that means the lens strength is equal at every point (meridian) of the eye.
To test the sphere, the doctor sets the lenses in the phoropter to the patient’s current prescription. So, when the patient looks through the phoropter, it should look the same as it would through their contacts or eyeglasses.
Then, the left eye is blocked to test the right eye first:
-
The doctor manually adjusts the lens strength ¼ notch
above the patient’s current prescription strength (option one: stronger) and ¼ notch
below (option two: weaker), switching between the two options to receive the patient’s feedback (“
which is better, one or two?”).
-
After option one or two is chosen, the doctor rechecks the
original setting as option “three.” (
“which is better, two or three?”) If the patient chooses option three (the patient’s original prescription), the doctor stops and moves to the left eye from here.
-
If the patient chooses a new lens strength, the doctor takes note of which direction (+ or -) the patient prefers and moves to the left eye.
Axis
This step of the exam helps check for astigmatism.
While sphere refers to a “blanket” lens that corrects blurred vision in all meridians of the eye, axis refers to the lens meridian that
doesn’t require cylinder power to correct astigmatism.
Axis is the lens meridian
90 degrees away
from the meridian that
does
require cylinder power.
-
The doctor pulls down the cross-cylinder—a lens that gives the effect of two cylindrical lenses of equal strengths but opposing shapes: one concave (curving inward like an hourglass), one convex (curving outward like a football).
Next, the doctor makes sure the prism knobs are in line with the dial axis marks. This checks axis power.
-
In plus (+) cylinder refraction, the doctor “chases” the white dots, turning the axis in the direction of the dots from the knobs.
-
When refracting in minus (-) cylinder, the directions are the same, except the doctor uses the red dots as a guide instead of the white.
Cylinder
Cylinder (often written as “CYL” on prescriptions), indicates the cylinder curve needed to correct astigmatism.
Unlike sphere, this lens power is shaped so one meridian has no added curvature,
while the meridian perpendicular uses the maximum power and lens curvature to correct astigmatism.
-
Once finished checking for axis, the prism is flipped about 45 degrees so the power marks align with the axis. Now, the doctor is working with cylinder power.
-
The doctor then asks the patient which is better, “one” (minus power) or “two” (plus power).
Recheck Sphere
Finally, the doctor double checks the sphere power and adjusts as necessary before confirming the final prescription.
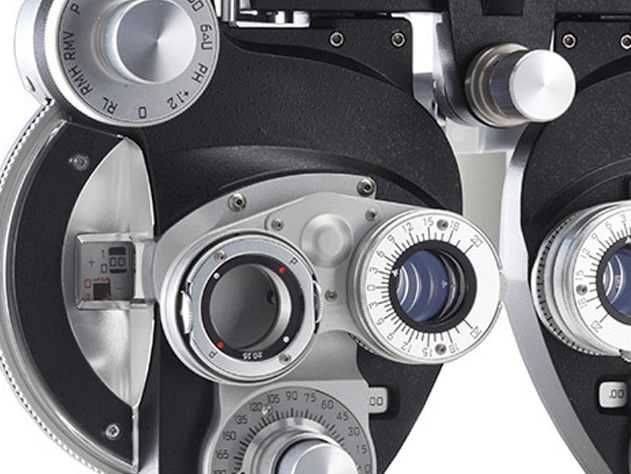
Phoropter: Parts and Setup
Now that we’ve gone over the general cadence of a refractive exam, let’s take a look at the parts and setup to understand how it works.
There are seemingly endless knobs, lenses, prisms, and levers on a manual phoropter. And while each piece has an important role to play, it’s easy to become overwhelmed by the sheer volume of parts, including:

1. Rotation Adjustment Knob
2. Mounting Bracket
3. Tilt Clamp Knob
4. Forehead Rest Knob
5. Spirit Level
6. P.D. Knob
7. Vergence Lever
8. Auxiliary Lens Scale
9. Auxiliary Lens Knob
10. Corneal Aligning Device
11. Rotary Prism Unit
12. Cylinder Axis Knob
13. Cylinder Power Knob
14. Cross Cylinder Unit
15. Cylinder Power Scale
16. Cylinder Axis Reference Scale
17. Cylinder Axis Indicators
18. Cylinder Axis Scale
19. Weak Sphere Dial
20. Sphere Power Scale
21. Strong Sphere Control
22. Leveling Knob
23. P.D. Scale
24. Reading Rod Holder
25. Reading Rod Clamp Screw
26. Turret Assembly
A Brief History of Phoropters
The history of the refraction system and invention goes back as far as 1909. In fact, refraction actually began with jewelers, who brought cases of eyeglasses door to door for folks to try on and purchase on-site.
Like most medical equipment, the timeline of its invention and evolving technology is not particularly linear; however, here is a general overview of the history of the refractor system:
1909: The monocular optometer was invented and had a range of +0.25 to +6.00 diopters. That same year, the DeZeng Phoro-Optometer was patented with a range of +15.75 to -19.75 as well as a Maddox rod and Risley prism for each eye.
1920: A smaller DeZeng Phoro-Optemeter was released.
1925: The American Optical Company bought Dezeng.
1927: A larger DeZeng model with increased lens size and a mounting bar for hanging was released. Before, the refractors were supported by a bar below.
1948: This was a revolutionary year for the refractor system; the newest model was larger and more modern.
1956: The redesigned refractor system, the RxMaster, introduced this year became the archetype for modern phoropters used today.
In the years since, technology has accelerated rapidly in the medical equipment industry.
Today:
Digital refraction systems were created to allow all aspects of a refraction exam, such as lens combinations and data entry, to be controlled by one panel.
Phoropters Today: Manual Vs. Digital
Like most inventions over time (think typewriters, telephones, or horse-drawn carriages), phoropters have evolved toward a more advanced system:
digital refractors.
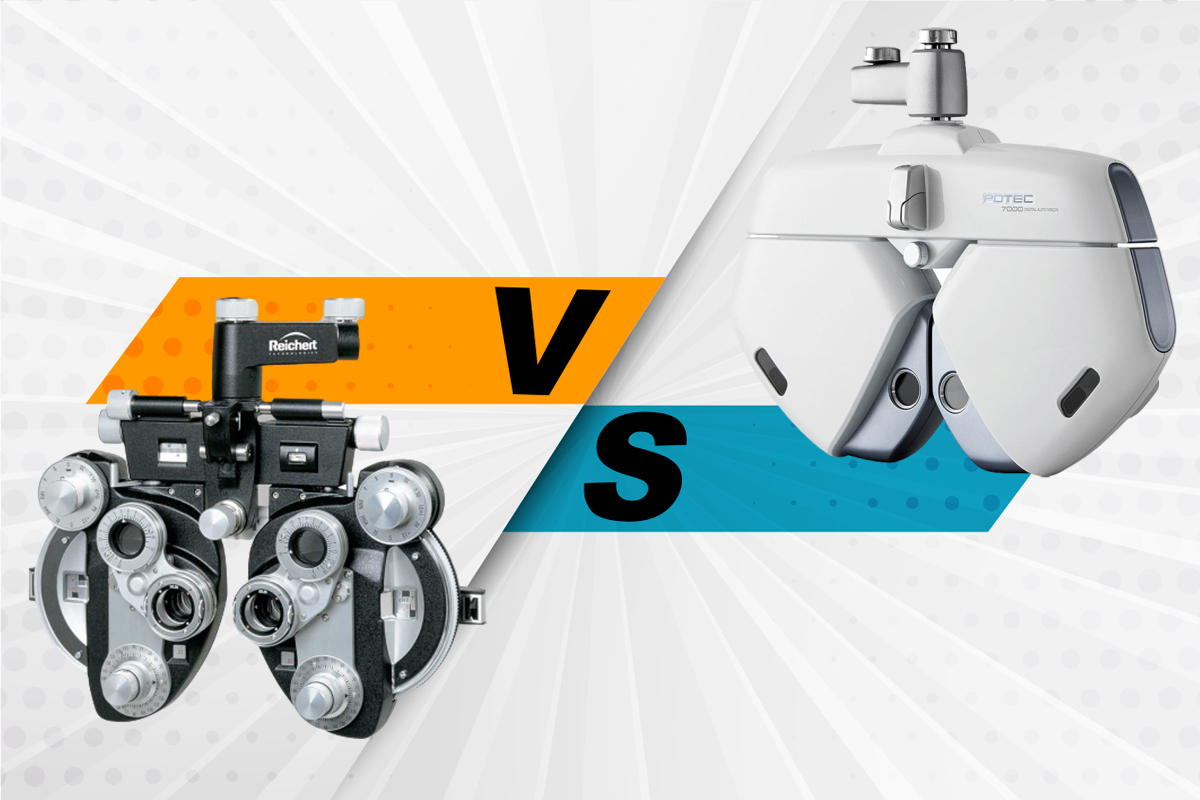
In many ways, digital refractors are the same as manual phoropters; both use the same methods to check and verify a patient’s optical prescription with cylinders, prisms, and lenses.
However, digital systems allow doctors to control the functions of a refraction exam with
one digital dial pad
; and with many added features (such as programmable sequences, wireless interface with pre-test equipment, and electronic recordkeeping), refraction exams are more streamlined, accurate, and effortless than ever.
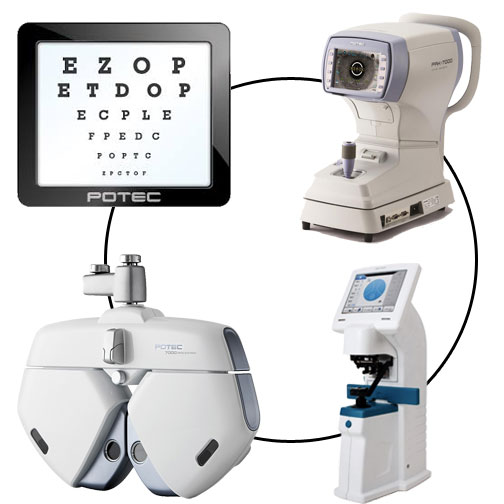
From pretest data to the final prescription, digital systems make it so doctors no longer manually enter data into both the refractor
and the patient’s record. Instead, with digital refractors, each piece of equipment communicates with each other; so pretest data is automatically sent to the refractor, and all subsequent information is saved directly to the patient’s digital record. This eliminates repetitive entries and makes prescription checks and updates easy and organized.
Suffice to say, in modern-day ophthalmic offices, digital refractors are quickly becoming the equipment standard over manual phoropters.
Here are some quick but noteworthy comparisons between the two:
Data Entry
Manual Phoropter:
Data collected during the patient’s pretest is manually entered into both the refractor and the patient’s record.
Digital Refractor:
With system integration, all data is automatically synced to each piece of equipment and recorded to the patient’s digital file, eliminating multiple entries.
Astigmatism Testing
Manual Phoropter:
When testing for astigmatism with a manual phoropter, doctors use the standard Jackson Cross Cylinder (JCC) and axis with bracketing to determine the patient's astigmatism.
This often results in the patient asking to go back and forth many times (i.e., "
Can I see that last one again?")
Digital Refractor:
When testing with a digital system, there are two options:
-
The standard JCC and axis
-
The Dual Cross Cylinder. This feature allows patients to see both options of the JCC
simultaneously, eliminating the back and forth.
Parts

Manual Phoropter:
Each knob on these systems is adjusted manually to assess the patient’s prescription, including:
-
Aperture control
-
Sphere power
-
Cylinder power
-
Cylinder axis
-
Jackson cross cylinder
-
Risley prisms
Digital Refractor:
The components of digital refractors utilize the same diagnostic parts, but are controlled with more advanced technology:
-
Electronic-driven refractor head displays powered lenses
-
Software panel changes the lenses in the refractor head and controls data entry
-
Autorefractor measures objective refractive error
-
Autolensmeter measures the power of the patient's current prescription
Additional Benefits of Digital Systems in a Modern World
Manual phoropters are quickly becoming a thing of the past, as more eye care professionals opt for digital systems, crediting digital refractors with:
-
Increased efficiency
-
Patient “wow” factor
-
Reduction of physical pain for the doctor
-
Increased accuracy, fewer mistakes
-
Increased capabilities
-
Connectivity of equipment
-
High return on investment
-
Integration with Electronic Medical Records (EMR)
Ophthalmic professionals
still practice the same methods and prescription techniques practiced for years—the digital refraction system simply allows this process to be even more efficient.
In fact,
switching to a digital refractor allows doctors to see two to six more patients per day.
With increasingly efficient offices,
patients have taken notice. Less time spent adjusting manual equipment means more one-on-one time between the doctor and patient.
But perhaps most noticeably, digital refractors have decreased and even eliminated physical pain and discomfort for many doctors.
While most of the public doesn’t realize, ophthalmic doctors often
suffer from repetitive motion disorders, due to uncomfortable manual adjustments from refraction exams every day. Digital systems allow doctors to control the functions of the testing equipment from a comfortable seated position next to the patient.
Types of Phoropters
While digital systems are considered the modern instrument to use in the ophthalmic industry, many doctors still opt for manual systems. And in the end, both manual and digital systems produce the same results: a prescription to correct a refractive error.
At
Veatch Ophthalmic Instruments, there are a wide variety of
phoropters and
digital refractors (and
accessories to keep those systems functioning).
Take a look through to learn more about these instruments and compare:
PHOROPTERS
DIGITAL REFRACTORS
Are You a Doctor Interested in New Phoropters for Your Practice?
For ophthalmic professionals around the country, Veatch offers high-end equipment that fits your unique budget and benefits all aspects of your practice.
Veatch’s highly skilled, factory-trained technicians are available to professionally set up and recalibrate your instruments upon purchase and can provide both local and remote support if you need maintenance or repair.
In some circumstances, we’re able to provide “loaners” while your equipment is being repaired, which may also be covered if your piece is still under warranty.
Looking to Move Toward Digital Retractors?
If you’re considering a digital refraction system, Veatch offers some of the most competitive prices on the market for state-of-the-art equipment and unmatched service. In fact, Veatch’s digital refractors are typically half of the cost of competitors’ systems because there is no middle man involved.
But perhaps the most valuable aspect of purchasing Veatch equipment lies in our service, both during and after a purchase. Veatch offers long-term security in your investment, including:
-
Two factory-trained teams dedicated to offering support for our digital refraction systems
-
A two-year warranty, double what most competitors offer
-
All equipment parts stocked by Veatch
-
In-house repairs, typically completed within the same day
-
Advanced repairs that typically take no more than three days
-
Free loaner equipment during repairs while under warranty
-
If you are past your warranty period, these loaners are provided for a modest fee
Contact us anytime for a free consultation and information on how you can improve your office with digital refractor systems.